# Facial Biometrics Integration Guide via SAML-SSL Protocol

***

#### Prerequisites

<mark style="color:$info;">Before starting this tutorial, it is essential that you already have a customer portal configured in FaceSign. If you have not done so yet, please follow the Creation and</mark> [<mark style="color:$info;">**Portal Setup on FaceSign.**</mark>](https://facesign.gitbook.io/biometria/guia-rapido-de-integracao)

***

### Part 1: Enabling the SAML Protocol on the FaceSign Portal

The first step is to obtain the SAML configuration data from your FaceSign portal. To do this, follow the steps below:

1. **Access the FaceSign biometric portal** with your administrator credentials.

<figure><img src="https://1944264865-files.gitbook.io/~/files/v0/b/gitbook-x-prod.appspot.com/o/spaces%2FZHOws1GppZYJspgX4wu1%2Fuploads%2FwwoKN9Y55rLlwQEBMZNi%2FWhatsApp%20Image%202026-01-21%20at%2012.21.49.jpeg?alt=media&#x26;token=368e59a2-4ea7-47bc-a712-6f205da92f7b" alt=""><figcaption></figcaption></figure>

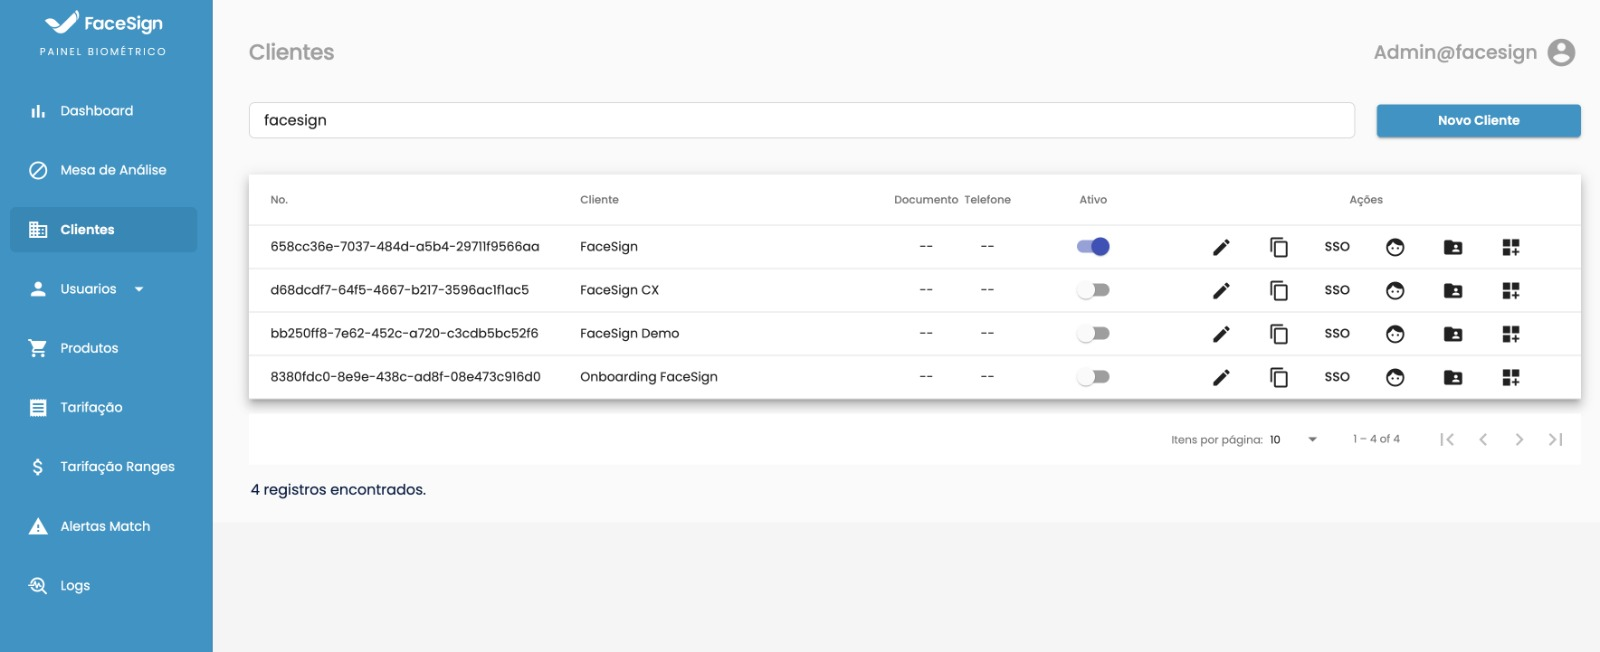
2. In the side menu, navigate to **Clients** and, in the list, open the edit page for the portal that will be used in the integration.

<figure><img src="https://1944264865-files.gitbook.io/~/files/v0/b/gitbook-x-prod.appspot.com/o/spaces%2FZHOws1GppZYJspgX4wu1%2Fuploads%2F5kYI6SLQz8zAqtXNToJh%2Fimage.png?alt=media&#x26;token=3f6cbbcf-d01f-4850-8ab4-50f6eda52f4b" alt=""><figcaption></figcaption></figure>

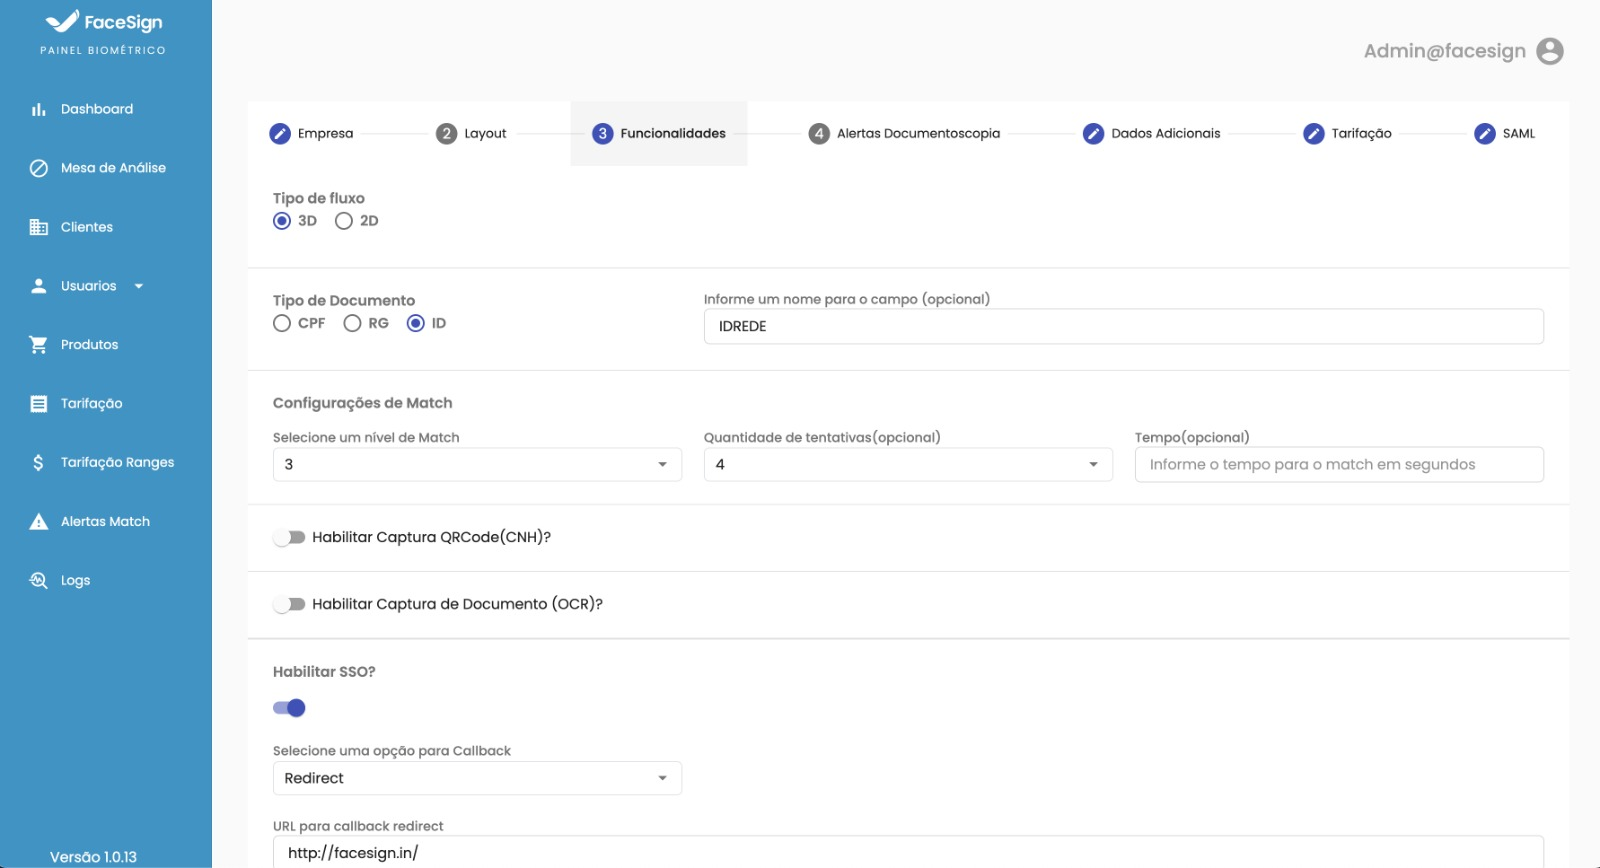
3. Within the client settings, go to the **"Features"**.

<figure><img src="https://1944264865-files.gitbook.io/~/files/v0/b/gitbook-x-prod.appspot.com/o/spaces%2FZHOws1GppZYJspgX4wu1%2Fuploads%2Ffk670weXafKJcFlGuVVJ%2Fimage.png?alt=media&#x26;token=8c85a1ff-bfb7-433b-9d76-3253b1e253bf" alt=""><figcaption></figcaption></figure>

4. Enable the option **"Enable SAML protocol?"**.

<figure><img src="https://1944264865-files.gitbook.io/~/files/v0/b/gitbook-x-prod.appspot.com/o/spaces%2FZHOws1GppZYJspgX4wu1%2Fuploads%2FWqBz3gOpyNspSVzuUJ7M%2Fimage.png?alt=media&#x26;token=161ac91c-6782-4790-8412-1db259b19549" alt=""><figcaption></figcaption></figure>

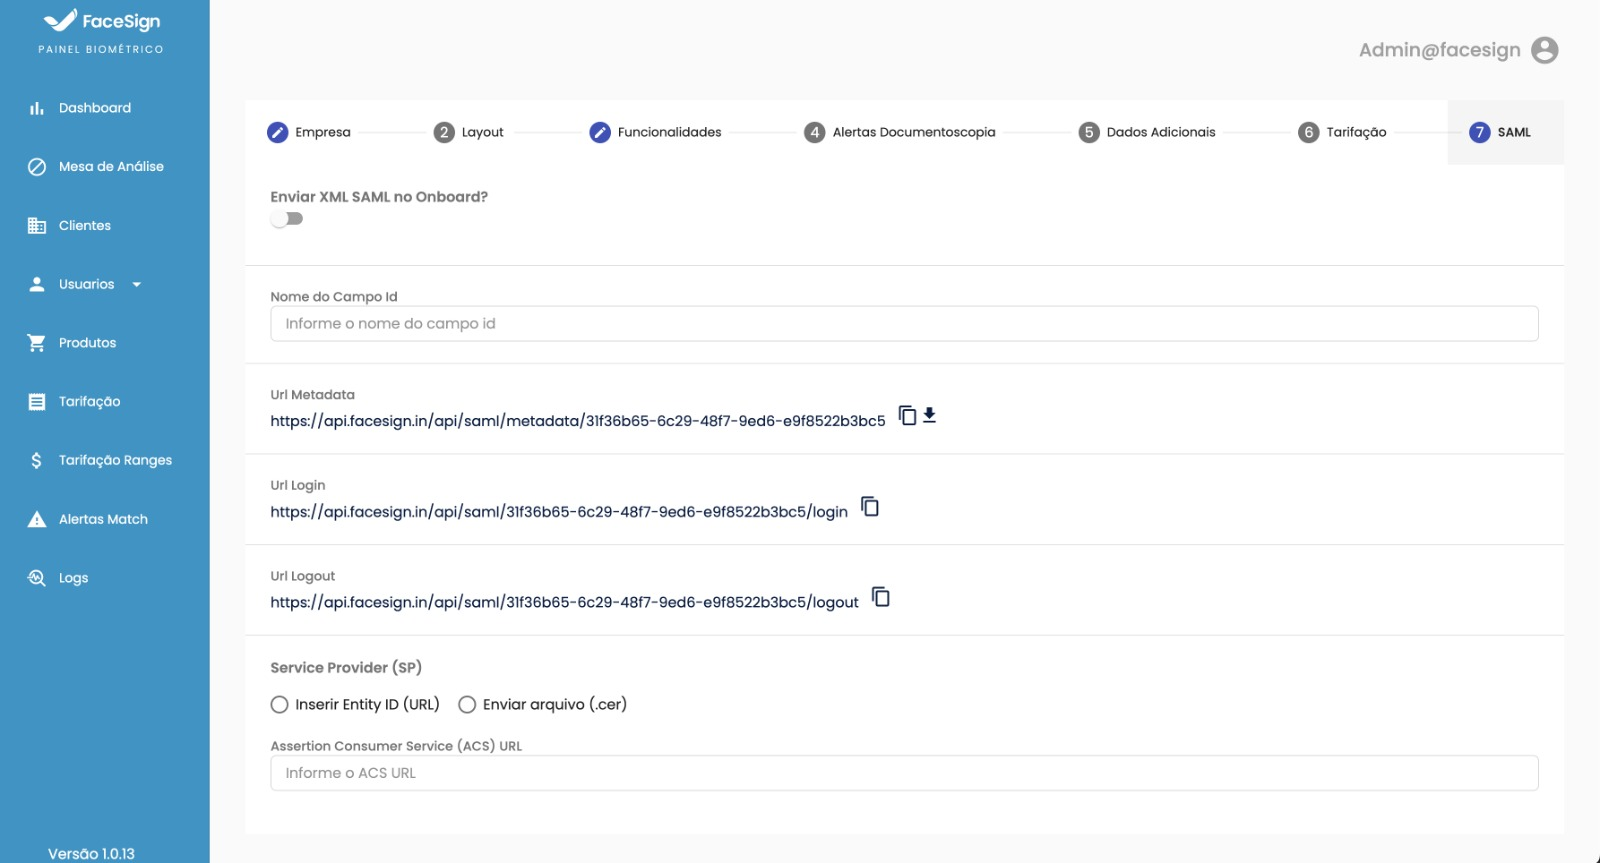
5. After enabling the option, a new tab called **"SAML"** will appear. Access it and **separate the information** (SAML XML, IDP Metadata, etc.) that will be used in the Fortigate configuration later.

<figure><img src="https://1944264865-files.gitbook.io/~/files/v0/b/gitbook-x-prod.appspot.com/o/spaces%2FZHOws1GppZYJspgX4wu1%2Fuploads%2FtGdBCbcjZ3FhySsPJFbD%2Fimage.png?alt=media&#x26;token=a97fcb53-e584-4b10-8914-5c0dfc574dbe" alt=""><figcaption></figcaption></figure>

***

### Part 2: Configuring SAML on the Fortigate

With the **FaceSign** data in hand, the next step is to configure the Fortigate to accept SAML authentication.

#### 1. Create a New SAML Service

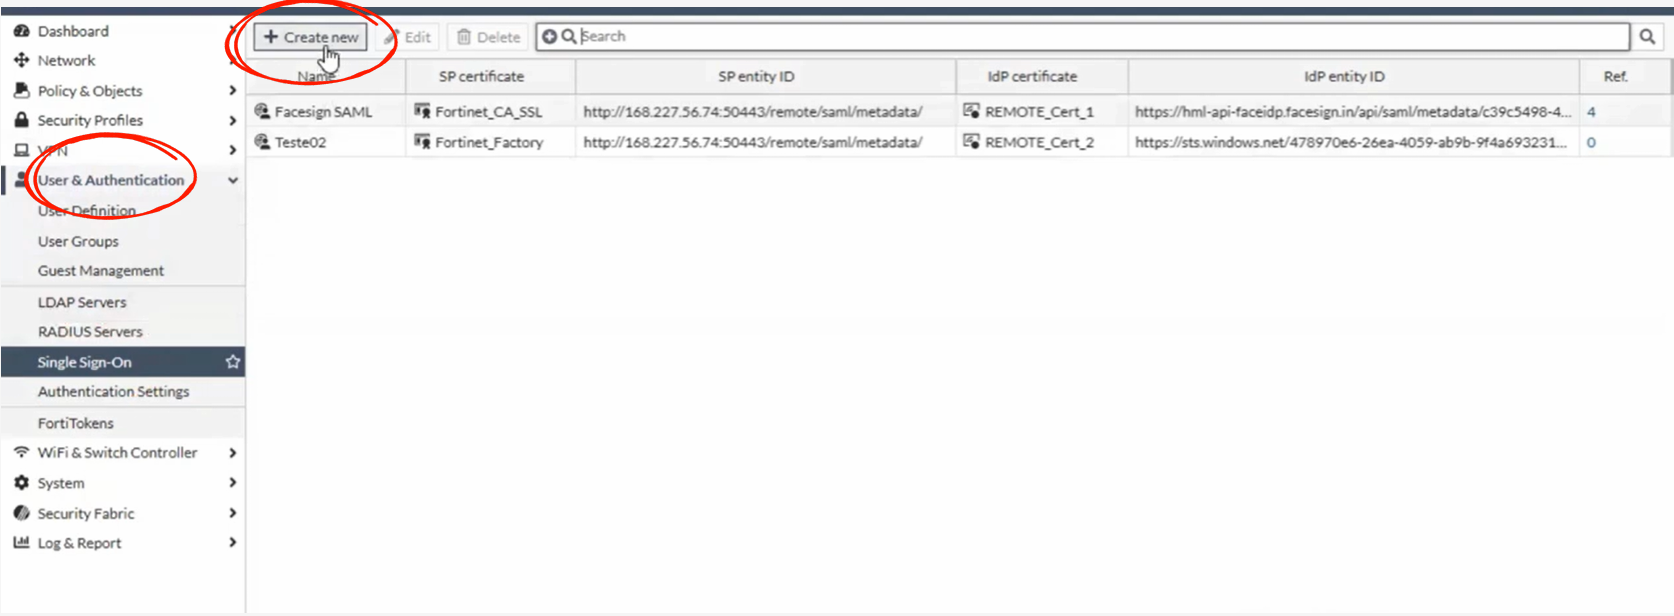
1. Navigate to **User & Authentication > SAML**.
2. Click **Create New**.

<figure><img src="https://1944264865-files.gitbook.io/~/files/v0/b/gitbook-x-prod.appspot.com/o/spaces%2FZHOws1GppZYJspgX4wu1%2Fuploads%2FJdK5E7LNy96zCUv12Aw9%2Fimage.png?alt=media&#x26;token=baed0a7f-eb5d-4a21-b8b8-160349564a2f" alt=""><figcaption></figcaption></figure>

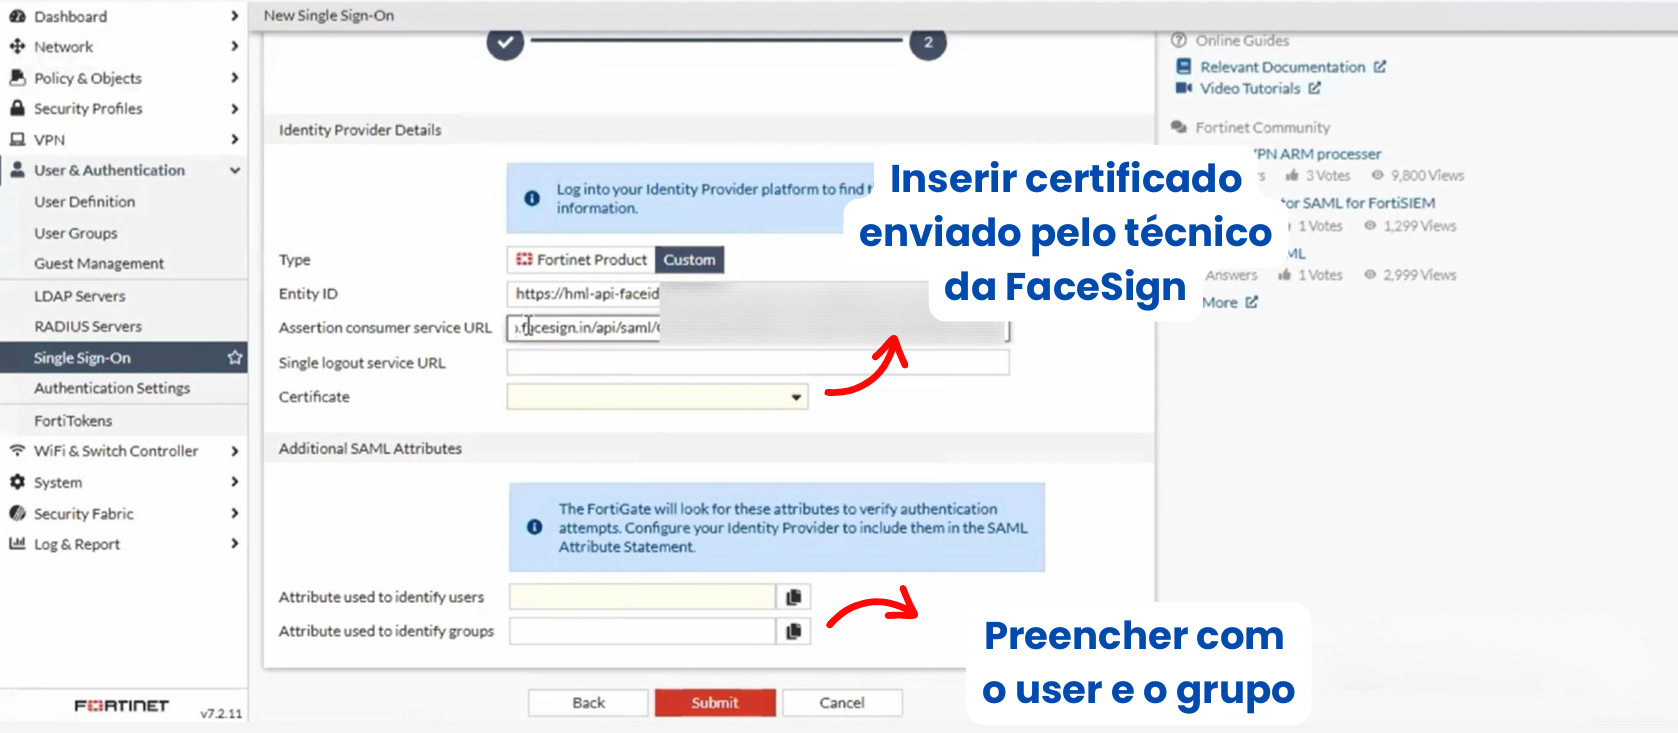
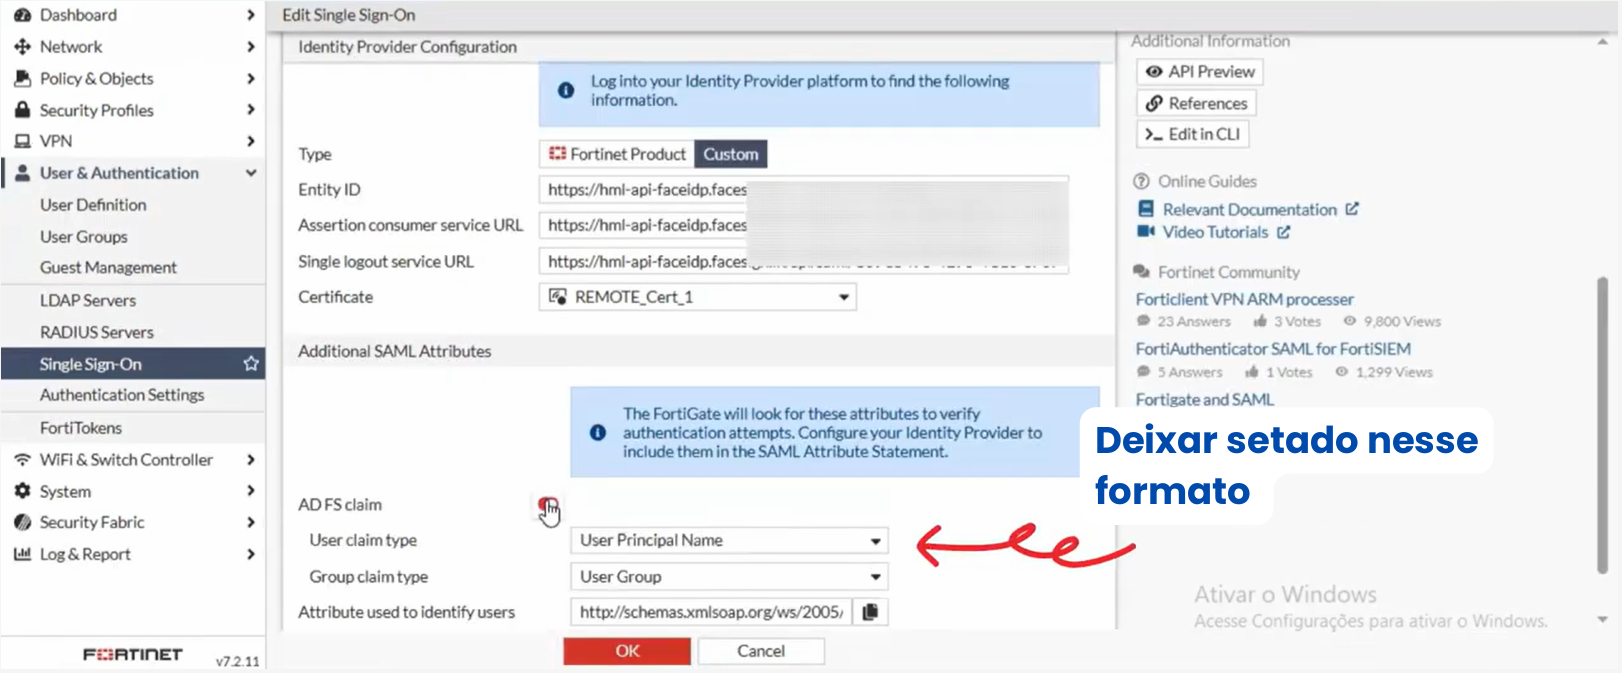
3. Fill in the fields according to the table below. The exact values for `Entity ID`, `Single Sign-On URL` and `Single Logout URL` must be obtained from the SAML metadata provided by FaceSign in the previous step.

<figure><img src="https://1944264865-files.gitbook.io/~/files/v0/b/gitbook-x-prod.appspot.com/o/spaces%2FZHOws1GppZYJspgX4wu1%2Fuploads%2FiUQzSos6Zo6DtY5wor3o%2Fimage.png?alt=media&#x26;token=e3ad30f4-1119-44aa-b9fd-573cb53f1066" alt=""><figcaption></figcaption></figure>

<figure><img src="https://1944264865-files.gitbook.io/~/files/v0/b/gitbook-x-prod.appspot.com/o/spaces%2FZHOws1GppZYJspgX4wu1%2Fuploads%2FnsH2LMZ9SgZA8DKOoMmh%2Fimage.png?alt=media&#x26;token=fab1113e-9988-4fc2-a381-8bb59cc70158" alt=""><figcaption></figcaption></figure>

| Field                      | Description                                             |
| -------------------------- | ------------------------------------------------------- |
| **Service Provider Name**  | A name to identify the service (e.g., `FaceSign-SAML`). |
| **SP Entity ID**           | Identifier of your VPN (hostname, IP, etc.).            |
| **SP ACS (Consumer) URL**  | Fortigate callback URL.                                 |
| **SP SLS (Logout) URL**    | Fortigate logout URL.                                   |
| **IdP Entity ID**          | Obtained from FaceSign metadata.                        |
| **IdP Single Sign-On URL** | Obtained from FaceSign metadata.                        |
| **IdP Single Logout URL**  | Obtained from FaceSign metadata.                        |
| **IdP Certificate**        | Enter the certificate sent by the FaceSign technician.  |
| **User Name**              | user                                                    |
| **Group Name**             | group                                                   |

***

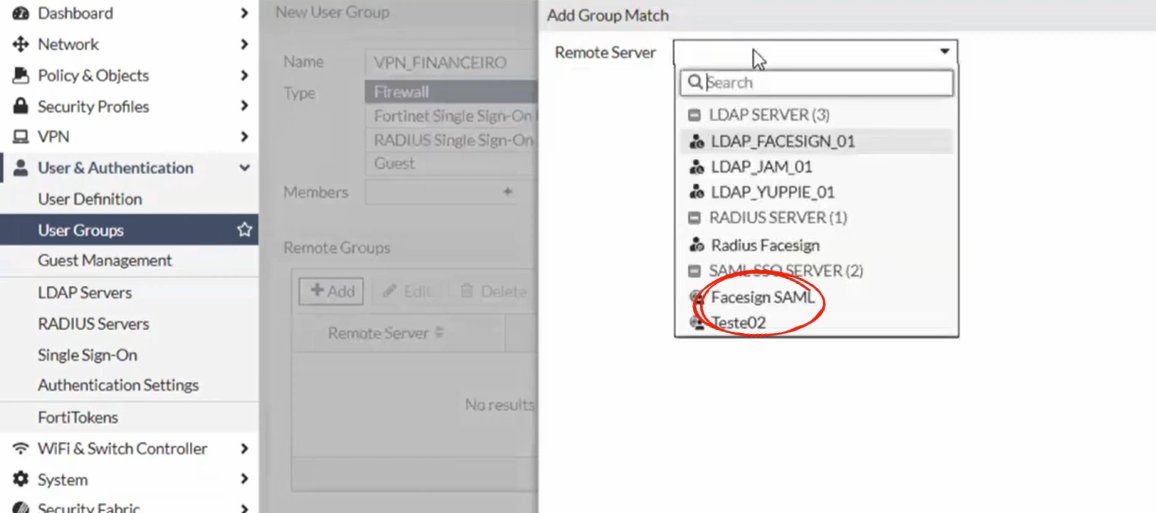
#### 2. Create a New SAML User Group

1. Go to **User & Authentication > User groups**.
2. Click **Create New**.
3. **Name the group:** `VPN-Access-Facesign`.
4. In **Type**, select `Firewall`.
5. In **Members**, click **Add** and select the SAML service created in the previous step (`FaceSign-SAML`).
6. Save the group.

<figure><img src="https://1944264865-files.gitbook.io/~/files/v0/b/gitbook-x-prod.appspot.com/o/spaces%2FZHOws1GppZYJspgX4wu1%2Fuploads%2FVWWQieQmnlyp4RAWBa5W%2Fimage.png?alt=media&#x26;token=c00f8104-cfa9-48b3-83dd-35b937d5d3dc" alt=""><figcaption></figcaption></figure>

<figure><img src="https://1944264865-files.gitbook.io/~/files/v0/b/gitbook-x-prod.appspot.com/o/spaces%2FZHOws1GppZYJspgX4wu1%2Fuploads%2FWMkk1dvDGBsGWcb1m8wi%2Fimage.png?alt=media&#x26;token=ac1b19e7-9e7b-48cc-9d62-500c207d3bc0" alt=""><figcaption></figcaption></figure>

***

#### 3. Configure the VPN Access Profile

**A. Enable and Configure the SSL VPN**

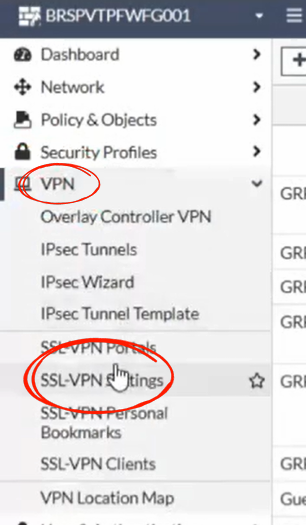
1. Go to **VPN > SSL-VPN Settings**.

<figure><img src="https://1944264865-files.gitbook.io/~/files/v0/b/gitbook-x-prod.appspot.com/o/spaces%2FZHOws1GppZYJspgX4wu1%2Fuploads%2Ftln2z9zG3FtpHwJbISNa%2Fimage.png?alt=media&#x26;token=3bca2055-05d2-4db6-8e82-d085bd74c698" alt=""><figcaption></figcaption></figure>

2. Set the **Listen on Interface(s)** (listening interface).
3. Enable **Tunnel Mode**.
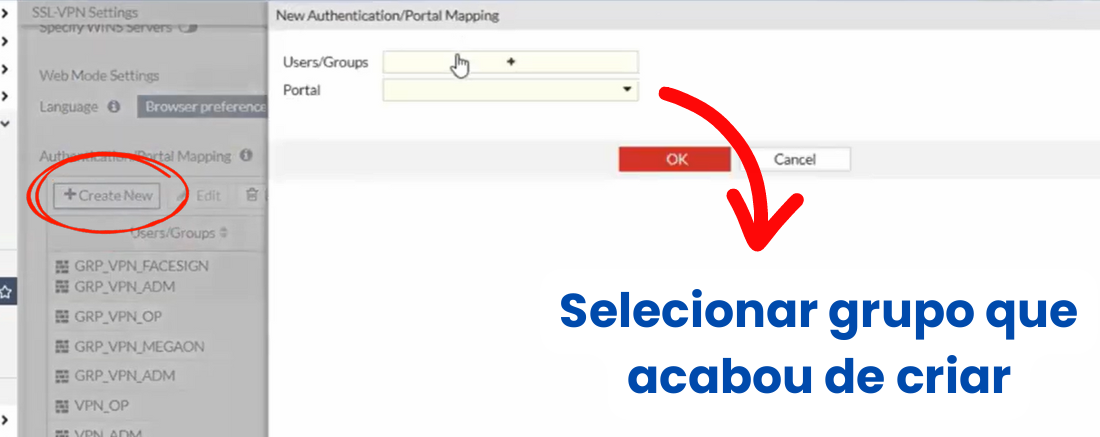
4. In **Authentication/Portal Mapping**, click **Create New** and configure:

   * **Portal:** `tunnel-access`
   * **User Group:** Select the group `VPN-Access-Facesign` created earlier.

   <figure><img src="https://1944264865-files.gitbook.io/~/files/v0/b/gitbook-x-prod.appspot.com/o/spaces%2FZHOws1GppZYJspgX4wu1%2Fuploads%2FFihTVNicQejimvBZhsh2%2Fimage.png?alt=media&#x26;token=173f43dc-5365-49a5-8da2-68d91ea5b619" alt=""><figcaption></figcaption></figure>

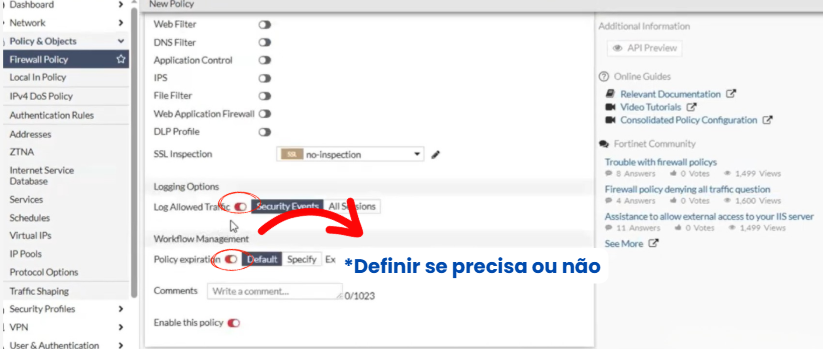
**B. Adjust the Firewall Policy**

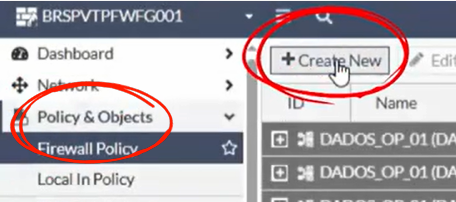
1. Go to **Policy & Objects > IPv4 Policy**.
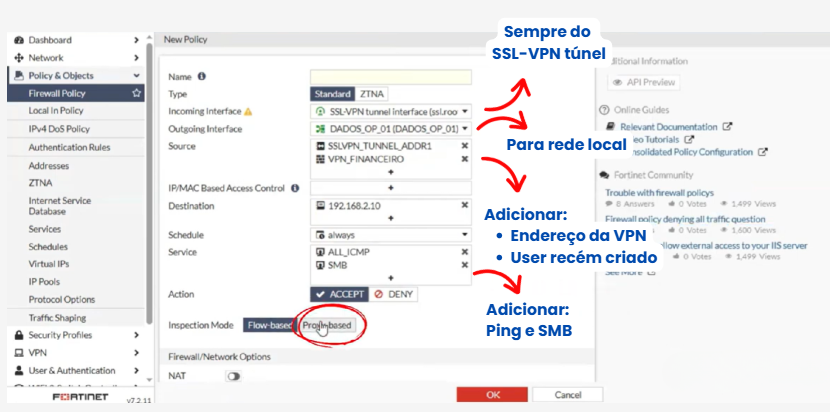
2. Create a new policy with the following settings:

<figure><img src="https://1944264865-files.gitbook.io/~/files/v0/b/gitbook-x-prod.appspot.com/o/spaces%2FZHOws1GppZYJspgX4wu1%2Fuploads%2FWYVuWv3ilDZZXU45pTgg%2Fimage.png?alt=media&#x26;token=02334db7-0db8-4126-b397-7835e38ccc2b" alt=""><figcaption></figcaption></figure>

<figure><img src="https://1944264865-files.gitbook.io/~/files/v0/b/gitbook-x-prod.appspot.com/o/spaces%2FZHOws1GppZYJspgX4wu1%2Fuploads%2F1oiyFEZcow2eYO8AyDrl%2Fimage.png?alt=media&#x26;token=9a00616c-e487-472e-ae03-e990ef2f483e" alt=""><figcaption></figcaption></figure>

<figure><img src="https://1944264865-files.gitbook.io/~/files/v0/b/gitbook-x-prod.appspot.com/o/spaces%2FZHOws1GppZYJspgX4wu1%2Fuploads%2FPLmaUwkqMqNpWr1gKlpc%2Fimage.png?alt=media&#x26;token=be857f20-2833-42a6-836a-b4b02be4ad20" alt=""><figcaption></figcaption></figure>

| Field                  | Value                                                       |
| ---------------------- | ----------------------------------------------------------- |
| **Incoming Interface** | SSL-VPN tunnel interface                                    |
| **Outgoing Interface** | Your local network interface (e.g., `lan`).                 |
| **Source**             | The VPN address and the user group `VPN-Access-Facesign`.   |
| **Destination**        | `all` (or the specific addresses of your internal network). |
| **Service**            | `ALL` (or specific services such as `PING`, `SMB`).         |
| **NAT**                | Enabled, if necessary.                                      |

3. Save the policy.

***

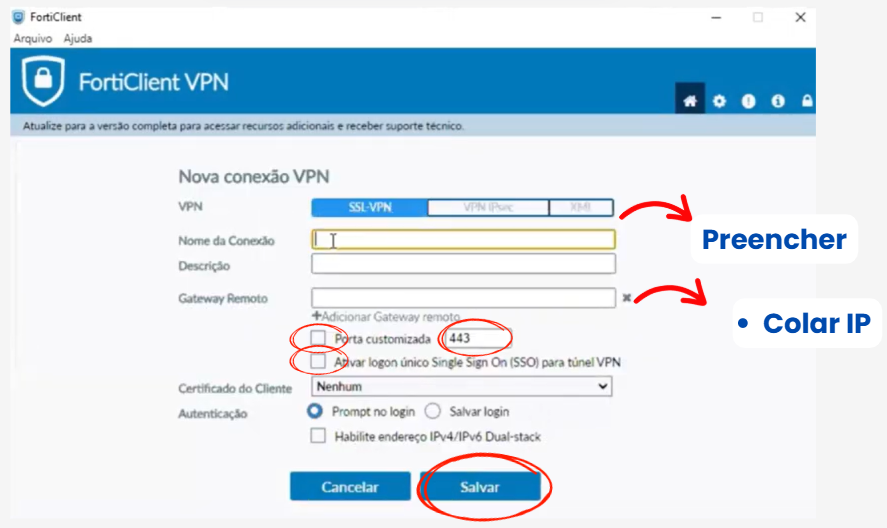
### Part 3: Testing the Connection

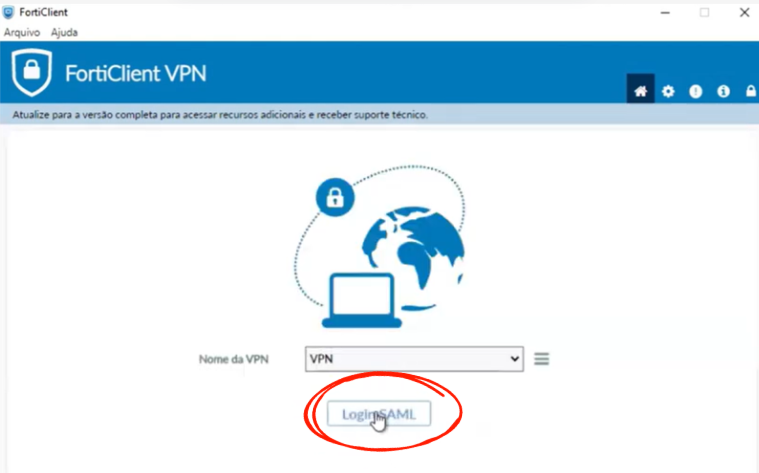
1. Access the URL of your SSL VPN (e.g., `https://<your-public-ip>` ).
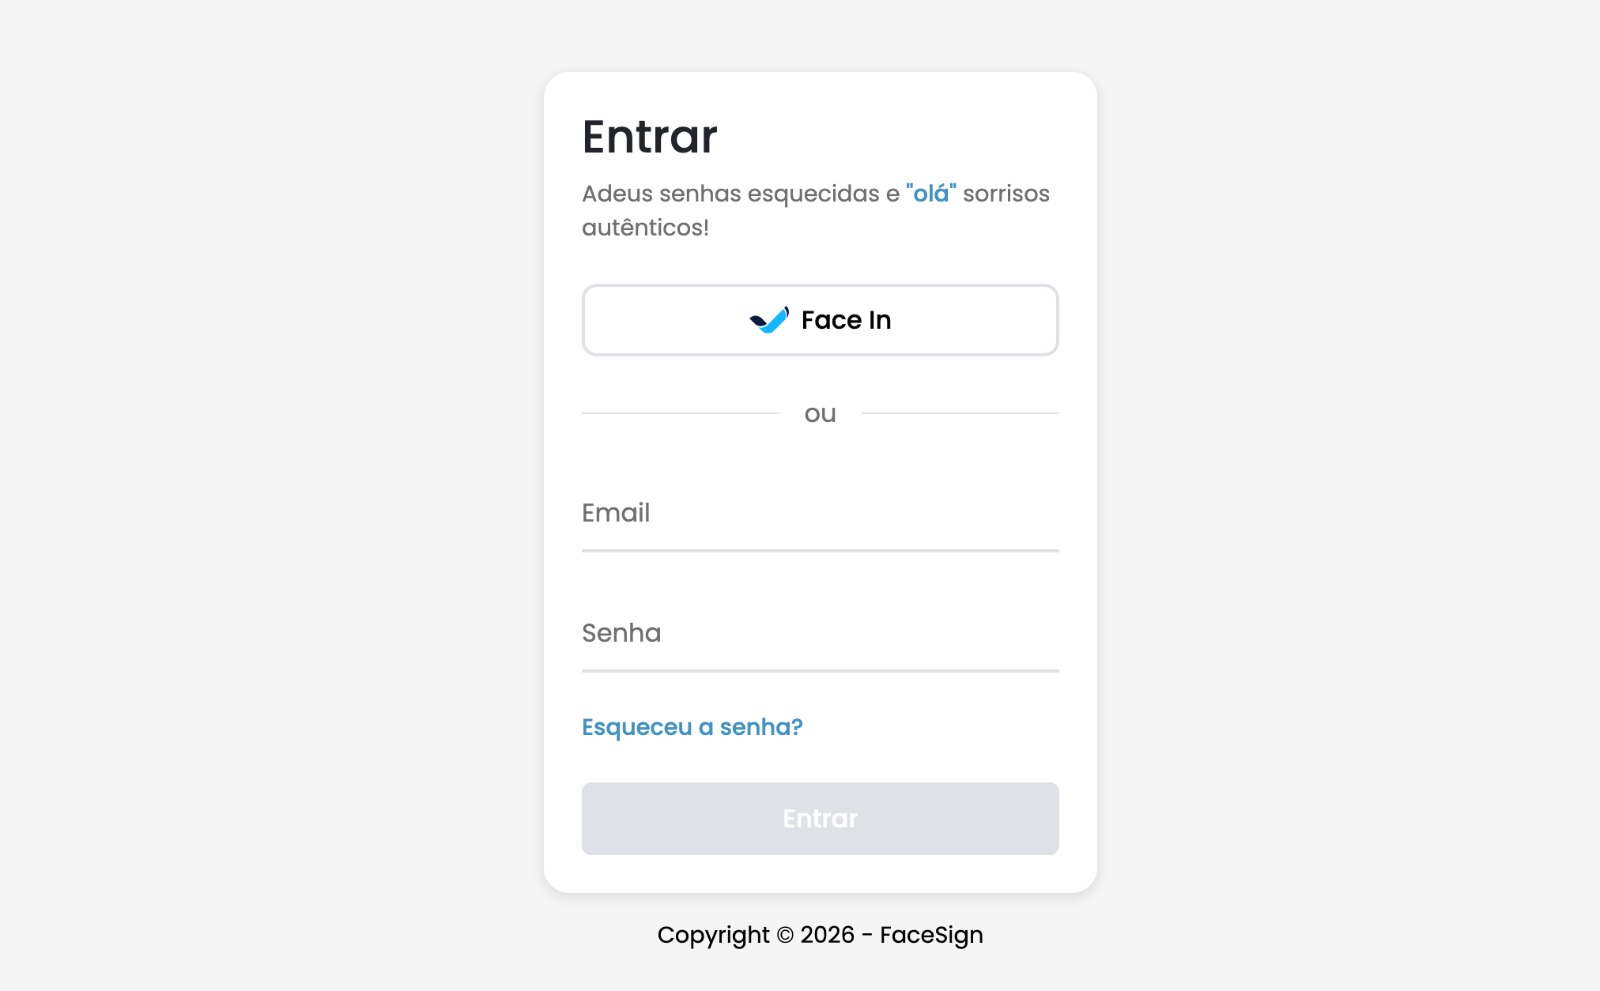
2. You will be automatically redirected to the FaceSign authentication page.
3. Log in with your registered email.
4. Perform biometric authentication by facial recognition.
5. After approval, you will be redirected back to the Fortigate SSL-VPN portal.
6. Click **"Connect"** to establish the VPN tunnel connection.

<figure><img src="https://1944264865-files.gitbook.io/~/files/v0/b/gitbook-x-prod.appspot.com/o/spaces%2FZHOws1GppZYJspgX4wu1%2Fuploads%2FjlGjsUpXuFToVeCRQnkC%2Fimage.png?alt=media&#x26;token=a0c33fab-5461-4e4c-958e-c853a0635a96" alt=""><figcaption></figcaption></figure>

<figure><img src="https://1944264865-files.gitbook.io/~/files/v0/b/gitbook-x-prod.appspot.com/o/spaces%2FZHOws1GppZYJspgX4wu1%2Fuploads%2FJRTui0gXWRG1WAUmScQU%2Fimage.png?alt=media&#x26;token=4d9b7968-b0a4-4b3c-9b79-65c57673c667" alt=""><figcaption></figcaption></figure>

#### **Success!** You are connected to the internal network with the security of facial biometrics

***

### Support and Contact

For technical support or questions, use the FaceSign Admin Portal or contact our team through the official channels.
